| Configuration Editor |
|
All the setup of the motors, detectors, etc. in SPEC is done by typing the command "config" from the SPEC prompt. This command launches the configuration editor allowing you to set which devices SPEC is controlling. Unfortunately there is almost no documentation in the SPEC manual on how to change things once inside this editor. Hopefully this section can make it clearer.
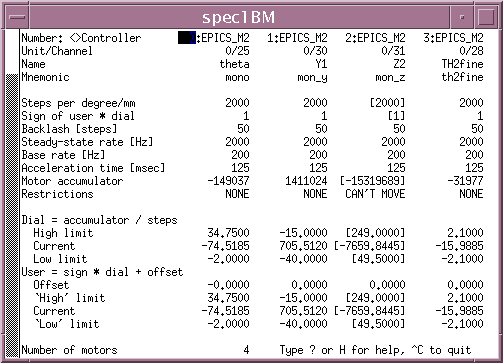
When you type config from the SPEC command line you should get a screen which looks like the one shown below. This is the screen for configuring motors. To toggle to other configuration screens ( i.e. to setup detectors, serial devices, etc.) you must type "c".
|
 |
| |
| How to Configure motors. |
When configuring a motor when running SPEC under EPICS, you only need to be concerned with the lines which are highlighted in red in the figure above. The steps in configuring a motor are listed below.
Step 1: Move the cursor using the arrow keys to the bottom of the screen and type in the number of motors you want to configure in spec. You do not need to have all the motors on the beamline defined in the program only the ones which are necessary for the experiment.
Step 2: Move the cursor to the line "Number<>Controller" and move to the position where it says "EPICS_M2" above, for the motor you want to configure. Typically only 4 motors are displayed on the screen at once, you can move to other motors simply by repeatedly pressing the left and right arrows. If this is a new motor it will display "NONE" in this position. Press "+" on the keypad, this will bring up a list of motor drivers supported by spec. Move using the up and down keys till you get to "EPICS_M2" and press return. There is also and option "EPICS_M1" avoid using this option (unless a user wants it) since in this option the current motor configuration in spec will overwrite the settings in the EPICS database.
Step3: Move down to the Unit/Channel line. Type in the IOC number (see ioc setup below) and motor number. For example on the 4-ID-D beamline motors starting with "4ddx:" are defined as unit 1, therefore one would type 1/23 for motor "4iddx:m23".
Step 4: Enter a name for the motor. This does not have to be the same as the name that the motor has in the EPICS descriptor field. This name will appear in the spec scan headers of the data file and when you show the motor positions. To type this in you must type a " ' " then the motor name and press return.
Step 5: Enter a mnemonic for the motor (also type " ' " followed by the mnemonic and return). The mnemonic is a shorter name (no spaces) for the motor which is used when you scan the motor. For instance when you scan the motor "Two Theta" you use the mnemonic "tth", by typing a command such as "ascan tth .1 .2 20 1".
Step 6: Type "w" to write the parameters to the configuration file. Answer "yes" to the prompted questions
Step 7: Press "^C" to exit back to the spec command line. Ignore the warning messages about the limits.
|
| |
| Changing a detector setup. |
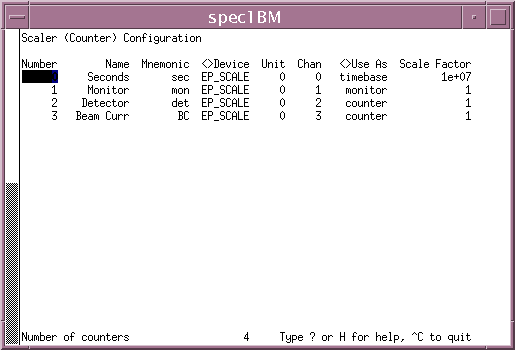
| When you enter the configuration editor type "c" key untill you see the screen below. |
 |
|
Follow similar steps as those used to configure a motor.
Step 1: Move the cursor using the arrow keys to the bottom of the screen and type in the number of detectors you want to configure in SPEC. You do not need to have all the channels of the Joerger scaler defined only the ones you want stored in the data file. All detectors are stored in the data file for each scan.
Step 2: Move the cursor to the "NAME" and "MNEMONIC" columns type " ' " (single quote) followed by the name and mnemonic for the detector. Again these names are only used within SPEC and do not have to agree with the names in EPICS.
Step 3: Move the cursor to the line "DEVICE" column. Press "+" on the keypad, this will bring up a list of scalers supported by SPEC. Move the cursor using the up and down keys till you get to "EP_SCALER" and press return. Note any EPICS PV can also be configured as a scaler channel. See steps below for how to do this.
Step 4: Type 0 for the unit number, and under "CHANNEL" type the channel on the Joerger scaler that you want to configure. If you have more than one scaler card defined type 0,1,2,etc under the unit number. The order is the same as that defied in the IOC setup (see below)
Step 5: If this scaler is used as the clock to give the number of seconds per point go to the column "USE AS" type "+" and choose timebase and type in the scale factor under "SCALE". If the detector you are configuring is primarily going to be used as the monitor, type "+" under "USE AS" and choose monitor.
Step 6: Type "w" to write the new setup to the configuration file. Exit configuration editor by typing "^C".
|
| Adding a EPICS PV scaler channel |
|
Replace steps 3 though 5 above with these.
Step 3: Move the cursor to the line "DEVICE" column and choose the "EPICS_PV" device.
Step 4: Under the unit number type the number of the EPICS_PV device configured in the devices screen (see IOC configuration below). For example, if you have defined "SR:" and "4id:" as EPICS_PV devices, they would be units 0 and 1. If you are reading more than multiple PVs from an IOC you give each one a different number under the "NUM" column.
Step 5: Now you need to tell SPEC what the rest of the PV name is you want it to read. To do this type the "s" key. This brings up a screen shown below where you can input additional information about each scaler. Under the "Misc 1" column enter the rest of the PV name. For example, if you want to read in the storage ring current (PV name = "SR:currentAI"), you need to enter "currentAI". The prefix "SR:" is defined in the devices setup .
|
| |
| Changing the IOCs spec talks to. |
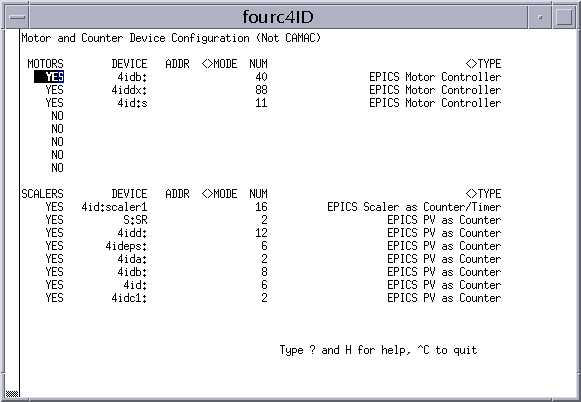
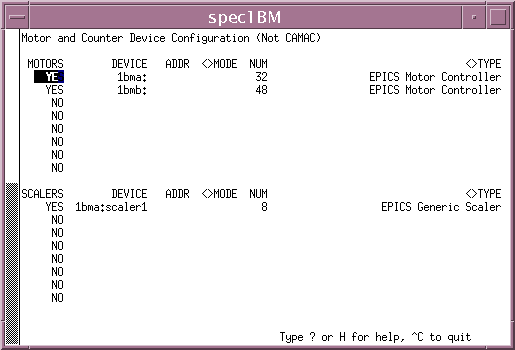
| SPEC really does not make distinctions on a IOC level but builds up PV names from prefixes. To change the list of prefixes which spec communicates with, press "c" in the configuration editor untill you see the following screen: |
 |
|
To add a new list of motors which SPEC communicates with do the following
Step1: Use the arrow keys to move to the "MOTORS" column, move to one of the lines that starts with "NO" and type "y" or "yes".
Step2: Move over to the "<>TYPE" column press "+" key, then choose the "EPICS Motor Controller" driver using the up and down arrows and press return.
Step3: Go to the device column type a single quote (" ' ") followed by the EPICS IOC prefix for the motors you would like to add (i.e. something like "4iddx:"). Then enter the number of motors which have that prefix under "NUM" (needs to be larger than the highest motor number).
Step 4: Type "w" to write the new setup to the configuration file. Exit configuration editor by typing "^C".
To add or configure an EPICS scaler in SPEC:
Step1: Use the arrow keys to move to the "SCALERS" column, move to one of the lines that starts with "NO" and type "y" or "yes".
Step2: Move over to the "<>TYPE" column press "+" key, then choose (use the up and down arrows and press return) either "EPICS Generic Scaler" driver (Step 3a below) for an actual hardware scaler such as the Joerger or "EPICS PV" driver (Step 3b) if you want to SPEC to read in any generic EPICS PV on the beamline each time the scalers are read (such as the storage ring current).
Step3a: For hardware scaler, go to the DEVICE column type a single quote (" ' ") followed by the name of the EPICS scaler record you are adding (i.e. something like "4id:scaler1"). Then enter the number of scaler chanels for this counter under "NUM" (typically 16 channel scalers). Note: Currently SPEC can be configured to comunicate to multiple EPICS scalers, but only one scaler can be have channels that are used as "monitor".
Step 3b: To configure a generic EPICS PV as a scaler, simply go to the DEVICE column type a single quote (" ' ") followed by the prefix of the IOC you would like to read a PV from (i.e. something like "SR:" if you want to read in a storage ring parameter).
Step 4: Type "w" to write the new setup to the configuration file. Exit configuration editor by typing "^C".
|
