Chapter 9 DM: Run-time Operation
4. Display Manager Operations
This section covers DM display operations, manipulating controller objects, and using related display callups, execute script objects, kill display, print display, and print options objects. In addition, this section will discuss the operations that you can perform on plots. All these operations are very simple, and you probably can figure them out on your own. Still, this section will probably point out some things that are not obvious to everyone who uses DM.
An important general operation referred to in this section is highlighting. You highlight something by moving the mouse's pointer over it. An outline appears around an object when highlighted. You can only highlight controller objects, not plots nor monitors.
4.1. The Display Manager Menu
If you hold down the right mouse button in any part of the display that is not occupied by a controller object or a plot, you will bring up a menu consisting of five options:The operation that each of these performs is fairly obvious from their names; however, there are a few things you should know about each option.
Selecting the Qwik Print and Print options. The print option "dumps" the current display to the PostScript printer specified in the Select Printer dialog box or to a specified file if Print to File is chosen. Displays will not print on other types of printers, only PostScript printers. For information on selecting a PostScript printer, see the section Setting Your Environment Variables or the section The DM Window earlier in this chapter.
The Select Printer option brings up a dialog box in which you can enter the name of your PostScript printer. Or you can print the display to a file by choosing Print to File and entering in a file name. By default, the PostScript printer is the one named in your PSPRINTER environment variable.
The Exit Display Window option quits the current display.
4.2. Chan Name Pop-up Windows
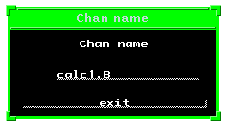
A minor feature that is available as of version 2.2 is the "Chan name" or channel name pop-up window. By highlighting a dynamic object, pressing the Shift key, and holding down the middle mouse button, you will bring up this window which contains the channel name of the highlighted object, as in Figure 9-3. Using the channel name pop-up window you can view the entire channel name of any dynamic object. The channel name appears in a text-entry field so you can use the text-entry menu to copy or cut the channel name and paste it into another text-entry field. You cannot, however, change the channel that the object connects to by changing the name in this window.4.3. Using Related Display Callup, Execute Script, and Kill Display Objects
Related display objects, execute script objects, and kill display objects, though grouped in the controllers subclass do not actually control channels, but they perform operations that are useful, if not necessary, to the efficient run-time operation of DM.4.3.1. Related Display Callup Objects
Related display callup objects have a triangular marker on their left-hand edge that identifies them as menus. They contain one or more displays choices.It is a little difficult to distinguish between menus, execute script objects, and related display callup objects since they have similar appearances, unless their title identifies what type of object they are.
To use a related display object:
- 1. Move the mouse's pointer over it to highlight it, then hold down the right mouse button, bringing up the menu of displays.
- 2. Choose the option for the display you wish to bring up (you choose an option by highlighting it and letting go of the mouse button).
Figure 9-4 shows a related display callup object with its menu. Keep in mind that not all related display callup objects may appear with a title identifying them as such.
Some related display objects may specify the same display file but with different arguments so that the display can connect to different channels. Though the same display file, they are not the same display.
A Related Display Callup Object.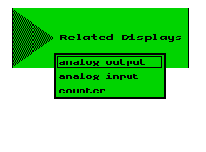
4.3.2. Execute Script Objects
Execute script objects contain a menu of other EPICS applications, other programs, shell scripts, or simple UNIX commands. Like related display objects, they are menus and have the triangular marker on their left-hand edge that identifies them as such.To invoke a script with an execute script object:
- 1. Move the mouse's pointer over the execute script object to highlight it, then hold down the right mouse button, bringing up the menu of displays.
- 2. Choose the option for the script you wish to start (you choose an option by highlighting it and letting go of the mouse button).
Execute Script Object and Its Menu.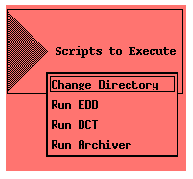
4.3.3. Kill Display Objects
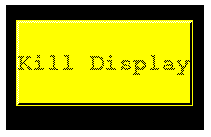
Kill display objects are buttons with which you can kill the current display. They do the same thing as the exit display option in the Display Menu, i.e., they close the currently open display. Recall that if the current display was the original display with which you started DM, the kill display button kills the entire DM process and all displays running in that process, which may or may not be desirable. For versions 2.3 or later, the DM process is no longer tied to any one display. To use a kill display button, simply left-click on it when it is highlighted.Figure 9-6 shows a kill display button with its default label.
4.4. Using Print Display and Print Options Objects
The print display and print options objects are objects that accomplish the same thing as the choosing Print or Select Printer from the Display Manager menu. They were implemented so that a user could print displays quickly without having to bring up the display manager's menu. Clicking on a print display object causes the display to be printed according to the current printer options. For example, if the user left-clicks on a print display button and Print to File has been chosen in the print dialog box, then the display will be printed to the specified file. If the user right-clicks on a print display button, the print options dialog box will appear, and the user can reconfigure the current printing options. In addition, the user can bring up the print options dialog box by left- or right-clicking on a print options button.The print display and print options objects can be configured to appear with any label, but by default print display buttons are labeled 'Print' and print options buttons are labeled 'Print Options.' The following figure shows a print display button.
A Print Display Button
4.5. Using Controller Objects
This section covers the six objects that are used to change the values of channels: valuators, text-entry objects, choice buttons, message buttons, menus, and toggle buttons. They are the most important of all objects, though very simple to use. By performing simple operations with the mouse or entering values from the keyboard, you can change their current values and thus control certain process variables.4.5.1. Valuators
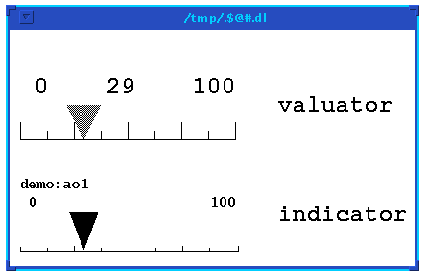
If you've configured displays with EDD, using valuators is like changing the values of certain properties in property sheets. Some properties are sliders, and you change their values by dragging the slider's pointer with the mouse, left to decrease the value, right to increase it.Valuators are somewhat similar in appearance to indicators, which can only monitor channels. Yet, they appear different enough so that telling them apart should not be a problem. Figure 9-8 shows a valuator and an indicator connected to the same channel. As you can see, the gauge marks of the valuator are larger than those of the indicators, and the valuator has value in between the high and low display limits (zero and 100), which is 29 in this case. The value in the middle is the current value of the channel, the current status of the process variable. The indicator has no such value. Valuators cannot be configured to appear with the name of their channel, as the indicator can, as seen in the figure, although the indicator can be configured to appear without it as well. Often, a text object will be attached to a valuator, indicating which channel it connects to.
Valuators can be positioned vertically, with their pointers directed towards the left or right, and also horizontally, with their pointers directed up or down. A valuator can appear with or without the gauge marks. However, a valuator always appears with the high and low display limits, the value of the channel, and the pointer.
To change the value of a valuator:
- 1. Highlight the valuator by moving the mouse within the valuator's borders.
- 2. Hold down the left mouse button and move or drag the pointer towards the left to decrease the value or towards the right to increase it. (If the valuator is situated vertically, drag the pointer towards the bottom to decrease the value or towards the top to increase it.)
- 3. Release the mouse to set the value.
You can only change the value within the limits determined by the high and low display limits. In the case of Figure 9-8, for instance, you cannot change the value to less than 0 or greater than 100. The high and low display limits are not modifiable within DM.
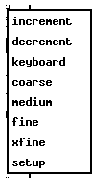
You can modify the behavior of a valuator in DM using the valuator's menu, which you bring up by holding down the right mouse button while the valuator is highlighted. It has eight options: increment, decrement, keyboard, coarse, medium, fine, xfine, and setup.
When you hold-left and drag the mouse either right or left to increase or decrease the valuator's value, the value changes in increments or decrements. The coarse, medium, fine, and xfine settings determine the gain of the valuator, the number of the increment or decrement. The coarse setting of the gain increments or decrements the value by 5% (approx.) of the range of the display limits; the medium setting increments or decrements the value by one-tenth the increment/decrement of the coarse setting or 0.5%; the fine setting, by one-tenth the increment of the medium setting, or 0.05%; and the xfine setting, by one tenth of the fine setting, or 0.005%. Therefore, you can change the value with varying degrees of exactness. By default, the slider is set to coarse. To change to another setting simply choose the desired setting from the valuator menu.
Choosing the keyboard option allows you to set the value manually by entering in the numbers from the keyboard. To use this option, choose keyboard from the slider menu, which will bring up the Keyboard Entry window. This window has an entry line in which you can enter the numbers for the value.
Invoking the increment and decrement options increases or decreases the value by the increment or decrement of whatever setting the valuator is on. If you invoke increment while the setting is coarse the value will increase by the increment/decrement of the coarse setting. You can also set the increment/decrement value manually with the setup option.
Invoking setup brings up a Valuator Setup window (Figure 9-10) that has three choice buttons and one text-entry line. The Gain choice button allows you to set the gain to the four settings discussed above. The Custom Increment/Decrement choice button allows you to enable or disable a custom increment/decrement number. If you left-click enable on the choice button, invoking the increment option, for instance, you can increment the value according to the Custom Increment/Decrement value. This value is set in the Custom Increment/Decrement Value on the text-entry line below the disable/enable choice button. You simply enter in the number of the desired increment or decrement. The Pointer Update Mode choice button lets you change the manner in which DM will update the display according to the changes you have made. If you left-click motion on the choice button, DM will update the display as you change the value in the valuator. If you left-click release on the choice button, DM updates the valuator only after you have released the mouse button.
It is important to note that the motion mode sends a range of values to its channel. For instance, if the pointer update mode is motion, the gain is coarse, and you move the valuator from 30 to 95, this will send 130 updates to the channel, the number of increments/decrements between 30 and 95 while the gain is coarse. Be aware that the motion option creates a lot of network traffic if you are changing values by large amounts frequently.
4.5.2. Text Entry Objects
Text entry objects allow the user to enter in values for the channel that the object controls. The value can be any number if the channel is an analog channel, or one of the possible values of any other type of channel. For certain channels like enumerated channels that have an index of possible values, you must match the string of the possible value exactly or the value will not change, or else you can send the index of the enumerated value (0, 1, 2, etc.). In addition, as of 2.4, a text-entry object can accept hexadecimal numbers as input: any input string whose first two characters are 0x or 0X will be interpreted as a hexadecimal number.Text entry objects resemble text update objects. One difference in appearance, however, is that the channel's value in a text entry object always appears on a line indicating it is a text-entry field. Also, the numbers in a text entry object cannot be appended by the engineering units of the channel they are connected to. Figure 9-11 shows a text entry object and a text update object. Both connect to the same channel. Notice that the text update object has the engineering units appended to it, though text update objects can be configured to appear without the engineering units. The distinguishing difference between the two is the entry line in the text-entry object.
Text Entry and Text Update Objects.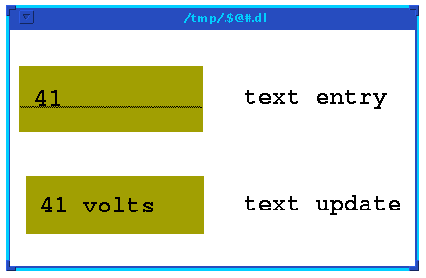
To enter in values for a text entry object:
- 1. Highlight the object. The cursor will appear after the last character in the entry, and you can place the cursor in another location by left-clicking the mouse on that location.
- 2. Use the <delete> key to delete the numbers or text you wish to delete and enter in the values you wish to enter.
- 3. Press Enter or Return on the keyboard.
Dm.teTimout X resource in your .Xdefaults file (see Setting your X Defaults in this chapter). Note that regardless of which behavior is used, Enter/Return must still be pressed to send the value to the channel.
Another X default which changes the behavior of text-entry objects is the Dm.teUpdate default. In past versions of DM, text-entry objects were only updated with the current value of the channel when the object was no longer highlighted, that is, when the mouse's pointer was no longer inside the object. The default behavior remains as such. However, now you can change this behavior so that the object is updated whether highlighted or not. By setting the Dm.teUpdate default to True, text-entry objects will be updated whether or not they are highlighted.
Like the text-entry fields in EDD, text entry objects in DM have an accompanying menu that will aid you when entering the values in a text entry object. After you've highlighted a text entry object, if you hold down the right mouse button, you will bring up a menu like the one in Figure 9-12.
The menu contains standard text-editing commands like clear, cut, copy, and paste:
| Invoking clear deletes everything currently on the text-entry line.
Invoking cut removes selected text from the entry line and places it in a clipboard or buffer. |
Copy places selected text in the buffer, but does not remove it from the entry line. |
Paste places text from the buffer onto the highlighted entry line, to the right of the cursor. |
|
The other options in the text-entry widget are not so obvious but are easy to understand and use:
4.5.3. Choice Buttons
Choice buttons are used with channels that have a set number of possible values, an index of values. More often, they connect to binary and multiple-bit binary channels. Choice buttons can have many different choices. What the choices are depends on the possible values of the channel they connect to.The choices in a choice button can be arranged in a column, in a row, and in columns and rows. The arrangement depends on how the button was configured. The most important thing about a choice button's appearance, however, is how to distinguish the current choice or the current value of the channel. All choice buttons have one choice that is currently the value of the channel. This selected choice will appear different from the rest: the background color of the choice will appear dimmer than the color of the other choices, but the foreground color will appear brighter than the other choices; though if the background color is black, there will be no difference in the background color of the choices. Figure 9-13 shows a choice button is connected to a multiple-bit binary channel.)
To change the choice of a choice button, move the mouse's pointer over the choice you wish to select and click the left mouse button. The value of the channel changes immediately.
A Choice Button (red=background color; white=foreground color).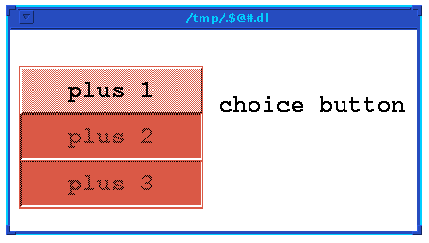
4.5.4. Message Buttons
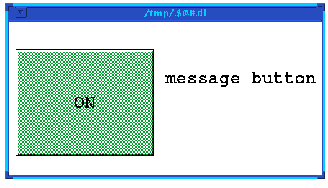
Message buttons are typically used to control discrete channels, usually binary output or input channels or multiple bit binary channels. A message button sends a value or message to the channel. Message buttons can have only two values or messages: the one you send when the button is pressed, called the 'press message,' and the one you send when it is released, called the 'release message'. The values of these messages depend on how the message button was configured, but usually, since message buttons are connected to simple binary channels, the press message (the value sent to the channel while the button is pressed) will be one and the release message zero, or on or off, or whatever. Because binary channels are discrete channels, they can also send strings, which the database routines will convert to the corresponding state value. Note that message buttons are not toggle switches. The press message is sent when the mouse button is pressed, and the release message is sent you release the mouse button. Thus, the value of the channel will be set to the press message value only as long as the you press the mouse button.A message button can be configured to display a label when you press it, and another when you release it and it becomes inactive. For instance, when you press a message button, it might be configured to say 'on', and when you release it and it is inactive, it might say 'off.
Figure 9-14 shows a message button while pressed. This particular button is configured to send a 1 when pressed and a zero when inactive. It is also configured to say 'ON' when pressed and 'OFF' when released and inactive. The background color of a message button becomes darker when pressed and its foreground will be brighter.
To press a message button, highlight the button and hold down the left mouse button for as long as you wish. Release the mouse button when you wish to send the release message and change the channel to its previous state.
4.5.5. Menus
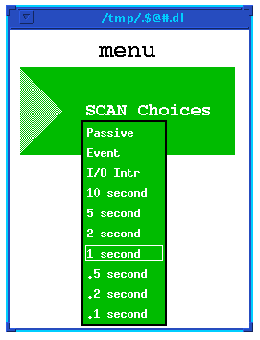
Controller Menus are like choice buttons in that they connect to discrete and string channels, usually multiple binary channels or channels with a set number of possible choices such as those of type RECCHOICE or GBLCHOICE.You can tell a menu by the triangular marker that appears on its left-hand edge (execute script and related display callup objects also display such a marker). Menus always appear with a label, which can be either a label that identifies the channel or process variable that the menu controls, or if no such label was specified, the current choice of the menu appears as the label. Figure 9-15 shows a menu connected to the SCAN field of a analog record. Its menu has all the possible choices of the SCAN field.
To use a menu:
- 1. Bring up the menu by highlighting the menu object and holding down the right mouse button.
- 2. Move the mouse downwards (still holding the mouse button) until the desired option is highlighted, that is, until the box appears around it.
- 3. Release the mouse while the desired option is highlighted to choose that option.
4.5.6. Filename Selection Menus
Filename selection menus allow a user to write a string of a file's name including the name of its directory to an EPICS Stringout record, though they could conceivably write strings to any string-type field. By clicking on a filename selection object, the filename selection dialog window will appear, and you can select a directory and file within that directory just as when specifying a display to load in DM or EDD, except that by clicking on Open, the string representing the file's name and its directory is written to the object's channel. The dialog window is exactly the same as the window for loading displays, shown in Figure 9-16.
Filename Selection Popup WIndow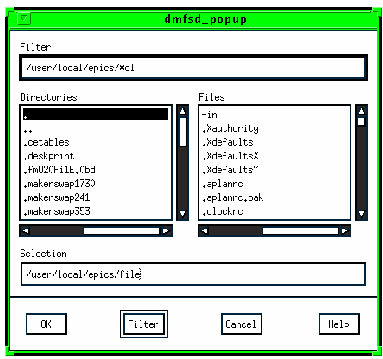
4.5.7. Toggle Buttons
The toggle button is a basic "on-off" switch. When you left-click on the toggle button, the value for the on or "one" state is sent to the channel. Then when you left-click the button again, the value for the off or "zero" state is sent to the channel. By default, the toggle button sends a 1 when it is on and a 0 when off, and it will display the strings corresponding to the 1 and 0 state in the channel (assuming that the channel is of type ENUM). However, the toggle button can send the state strings instead of the state values, upon which the database record will perform the discrete conversion, i.e., set the value of the record to the value corresponding to the string.To toggle a channel on and off:
- 1. Left-click the mouse button while the toggle button is highlighted to turn it on. Do the same to turn it off.
Toggle Button On (left) and Off (right).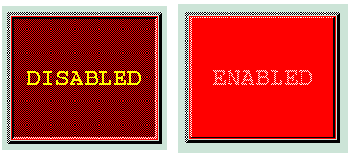
- 4.1. - The Display Manager Menu
- 4.2. - Chan Name Pop-up Windows
- 4.3. - Using Related Display Callup, Execute Script, and Kill Display Objects
- 4.3.1. - Related Display Callup Objects
- To use a related display object:
- 4.3.2. - Execute Script Objects
- To invoke a script with an execute script object:
- 4.3.3. - Kill Display Objects
- 4.4. - Using Print Display and Print Options Objects
- 4.5. - Using Controller Objects
- 4.5.1. - Valuators
- To change the value of a valuator:
- 4.5.2. - Text Entry Objects
- To enter in values for a text entry object:
- 4.5.3. - Choice Buttons
- 4.5.4. - Message Buttons
- 4.5.5. - Menus
- To use a menu:
- 4.5.6. - Filename Selection Menus
- 4.5.7. - Toggle Buttons
- To toggle a channel on and off:
EDD/DM User's Manual, 2.4 - 27 MARCH 1997 [Next] [Previous] [Up] [Top] [Contents] [Index]
