Chapter 5 Graphics Objects
6. Text Objects
This section discusses the text object in the graphics subclass. Graphics text objects are relatively easy to configure and to create.
A text object in the graphics subclass has two unique properties: the 'text string' and 'text alignment' properties. The 'text string' property is a text-entry line where you enter the text you want to appear in the object. If you were creating a text object that serves as a title to a display that monitors the different fields of an analog output channel, for instance, you would type a string like AO1 in the entry line, and the text string AO1 would appear in the text object.
Recall from the discussion on channel names in section Channel for Dynamics that you can use macros in place of the channel name and then expand the macro to a real channel name at run-time. In the same way, you can enter a macro in this property and replace it at run-time. If for instance, you want to include a title in a display that uses other macros, you could place a title at the top of the display that uses a macro, and then replace it at run-time with a more descriptive and specific title. Macros consist of a character or character string distinguished by a dollar sign and parentheses:
$(macro)The 'text alignment' property aligns the text string object to appear in a certain place within the borders of the object. The 'text alignment' property is a menu that you bring up by depressing the right mouse button while the property is highlighted. The menu has six options:
- 1. horiz. left
- 2. horiz. centered
- 3. horiz. right
- 4. vert. top
- 5. vert. bottom
- 6. vert. centered
When you align the text string using the horizontal options (horiz. left, horiz. centered, and horiz. right) and the text string is too long for the width of the object, EDD will not display the characters towards the end of the string; thus, you will only see a part of the text string. On the other hand, when you align the text string using the vertical options (vert. top, vert. bottom, and vert. centered) and the text strings is too long for the height of the object, EDD simply starts another column for the text, so EDD usually displays the entire text-string, unless it is long enough to take up all the columns that can fit into the object. The alignment of text in EDD is exactly how it will appear in DM.
Like all graphics objects, text objects appear in EDD exactly as they do in DM, so you know the exact size of the text during run-time from its appearance in EDD. The size of the text depends upon either the vertical size of the object or its horizontal size. Which size it depends on is determined by the 'text string alignment' property. If the text string alignment is horizontal so that the text reads from left to right, the vertical size of the object determines the size of the text string; but if the text string alignment is vertical, as in Figure 5-9, the horizontal size of the object determines the size of the text string. Figure 5-9 shows some of the different sizes of a vertically-aligned text string at various horizontal sizes. The smallest horizontal size is seven; the text string will disappear when the text string is less than seven. The size of the text string increases gradually until the horizontal size is about 16. As you can see, at any horizontal size over 15 the text string remains the same size.
To create a text object:
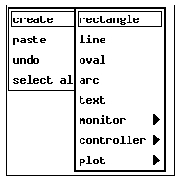
- 1. Choose text from the Create menu. The option for the text object in the graphics subclass is in a submenu of the Create menu's top-level menu, as illustrated in Figure 5-8.
- 2. The same outline appears as when creating other objects. Move the mouse to shape and size the outline.
- 3. Left-click the mouse to set the text object.
One thing you should know about text objects is that even though they have 'edge and fill style' properties, these properties have no effect on the appearance of the text object. A last thing you should know about text objects is that you cannot change the thickness of the text string with the 'line width' property in the object's property sheet. This property also has no effect on the appearance of the object.
Other than that, what applies to the rest of the objects in the graphics objects category applies to text objects. See General Characteristics and Properties in this chapter, for information on how to configure the general properties of text objects.
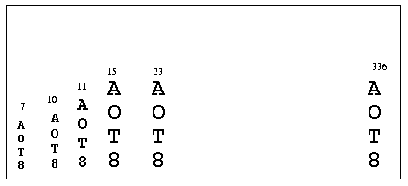 Font Sizes of a Vertical Text String at Different Horizontal Sizes.
EDD/DM User's Manual, 2.4 - 27 MARCH 1997 [Next] [Previous] [Up] [Top] [Contents] [Index]