|
| |
[Next] [Previous] [Up] [Top] [Contents] [Index]
Chapter 4 Creating and Manipulating Objects
2. Creating an Object
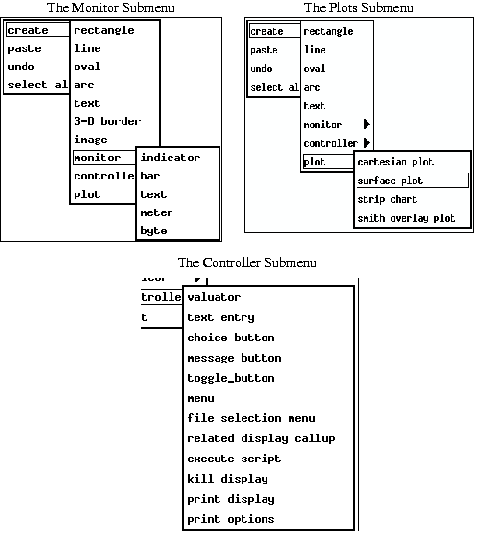
If you hold down the right mouse button in the drawing area when no objects are selected, you will bring up the Create menu, which has four options--create, paste, undo, and select all. Figure 4-2 shows several expansions of the submenus under the create option.
The create option in the top level of the Create menu contains a submenu that has options for every type of object in the graphics objects class. The same submenu also has three submenus that contain the options for the objects in the remaining object classes. Each of these three submenus contains an option for each particular type of object within that class (monitors, controllers and plots). There are 27 options for 27 different objects. Actually, the surface plot has yet to be implemented, so really there are only 26 objects.
To create an object:
- 1. With the mouse's pointer approximately where you want the object to appear, choose the type of object you wish to create from one of the submenus.
- 2. A square with a dot in its center appears.
- 3. Move the mouse without clicking or holding any of its buttons: notice the outline of dashes that appears.
This outline always has four sides, no matter what type of object you are creating, and even when the sides are so close that the box appears as a line. Most objects are rectangular, so their outlines will exactly match the outlines of the dashes. However, some objects that are not rectangular, such as lines, ovals, and arcs, will use the outline in a different way. For instance, a line connects between two corners of the outline. The exact manner in which lines, ovals, and arcs are drawn will be explained when we discuss those objects in Chapter 5.
- 4. When the object is the desired the size, left-click the mouse.
Remember that some of the attributes in the Display Attributes window determine certain properties of an object when it is first drawn. Exactly which attributes an object inherits depends on the object's property sheet, i.e., if it has a property that corresponds to a default attribute. You can then keep these defaults, or you can override them in the object's property sheet. See Property Sheets in this chapter for more information on overriding some of these defaults.
| NOTE: You should be aware that only objects in the graphics subclass appear in EDD as they will in DM. Monitors, plots, and controllers simply have an outline of dashes, which is the color of their foreground color, and the rest of the object will be the color of their background color. They will also have a label indicating what type of object they are and the channel that they will connect to. Only the colors and the size of plots, monitors, and controllers adumbrate how the object will appear at run-time. See chapters 5, 6, 7, and 8, for more on the specifics of these various objects, their run-time appearance, and how to configure them. |
The Create Submenus
- To create an object:
-
EDD/DM User's Manual, 2.4 - 27 MARCH 1997
[Next] [Previous] [Up] [Top] [Contents] [Index]
|
